I made this Mother’s Day Card almost exactly how I did in my last post except I used a different technique and medium for the stenciling of the Floral Frame stencil. This one came out so much more vibrant because of this technique.
Here they are side by side:
Using Liquitex Super Heavy Gloss Gel mixed with Mowed Lawn, Picked Raspberry and Worn Lipstick Distress Inks
Using Prima Light Paste and then brushing Distress Inks over it after dried.
You can see that by mixing the Distress Inks directly into a clear glossy medium, you will end up with vibrant results. Brushing the distress ink over the opaque Light Paste gave it more of a pastel effect. The card on the left did take significantly longer though. I had to mix each color individually and then carefully apply it through my stencil using a palette knife and masking off areas that I didn’t want a certain color in. For the card on the right, I just applied the Light Paste through the stencil , let it dry, and then brushed the Distress inks over top after placing the stencil back on to protect the surface underneath and keep the color just on the stenciled areas. I used the same Distress Ink colors except the green. I believe I used Peeled Paint for the card on the right.
For a list of supplies, please refer to my last post. Here’s the YouTube video of me making this card:
I try to do the Tim Holtz 12 Tags whenever I have a chance. It is a once a month art challenge that I wish I could make time for every month. To see the tag that Tim Holtz made, click here. Of course, most of the time I do not have all of the products that he has and sometimes I don’t really want my tag to look exactly like his. I was missing quite a few of the necessary products, so I improvised. I like how my tag came out though!
If you want to see how I made this tag, then stick around for the rest of the blog post!
Step 1: Tim used tissue tape, but I didn’t have any. I did have some of the tissue that he offers though. I figured I could just use some multi medium to adhere my tissue. WRONG! This created a barrier so my distress inks would not have a porous surface to soak into. You’ll see what happened later on.
Step 2: Tim scribbled various distress inks onto his craft mat, spritzed water and dragged the tag through. I did the same thing, but I used a mixture of distress and adirondack paints. It would have worked ok, but again, that multi medium messed it up and the paint only stuck in a few areas.
Step 3: In this step Tim stamps a big Butterfly in archival ink and then embosses it with clear embossing powder. He laster masks this image and stencils on top of it. I was crafting away from home and had limited supplies. However, I did bring some Art Acetate from Stamp On It with me and I had a butterfly image. I was crafting with my Mom and we wanted to try the glitter technique with the Art Acetate sheets, so I incorporated that into my tag and made it dimensional by bending the wings up. I didn’t add my butterfly until the very end and I used a little bit of Glossy Accents on the body to adhere it.
Step 4: This is where my tag starts to differ quite a bit. I wanted to do some background stenciling like he did, but not quite yet. Instead I decided to stencil a flower on my tag. I used Luster Mica Powder in Galactic Blue and Hawaiian Orchid. I used a palette knife to lay on some Modeling Paste and then sprinkled the Luster Mica Powders on top while it was still wet. I just tapped off the excess and funneled it back into my jar. Then I spritzed it with water and dried it with my heat tool. You can just set this aside to dry if you don’t want the bubbling that happens when you heat dry modeling paste.
Step 5: Now I wanted to do my background stenciling. I used Tim Holtz Harlequin Layering Tag Stencil with 3 different distress inks. At first, it looked gorgeous, then I realized the distress inks were just going to wipe off the areas where the multi medium was. So, after adding some crinkled seam binding that I colored with the same inks and a Tim Holtz metal embellisment that I found at a scrapbook expo (that I can only guess is a blast from the past, because I’ve never seen it!), I ended up mixing some of the Galactic Blue Luster Mica Powder with the multi Medium and scraped that through the stencil with a palette knife. Multi Medium WILL adhere to Multi Medium, so this finally worked! I also used a sponge dauber to ink the edges of the tag with Salty Ocean Distress ink.
Step 6: I added a Tim Holtz Metal Arrow to cover up the harsh line that I created when applying the Luster Mica Powder/ Multi Medium mix through the harlequin stencil. I also adhered the butterfly at this point.
Step 7: The tag still needed a little something, so I grabbed some of my arrow stamps from one of my Tim Holtz sets and stamped them in Archival Ink. Now the tag is done!
I hope you enjoyed my blog post and thank you so much for stopping by!
Now that I have officially released the Luster Mica Powders to everyone, I want to start releasing Technique videos and Technique blog posts. I think seeing what you can do with these powders in action will really show you exactly how diverse they are.
This first technique is about mixing the Luster Mica Powders with various gel mediums. Now, since the Luster Mica Powders already have a built in binder, we aren’t relying on the gel to work as a binder, but rather using the gel so we can get a different look and perform different techniques that we can’t achieve with using water and mica powders alone.
Heavy Gloss Gels and Gloss Gels will add dimension to your work. This extra body will allow you to use your mica powders with stencils and texture tools. You can also brush a thin layer of your mica infused gel over a project or portion of a project to seal it in or to layer on top of. You can create multiple layers this way and protect the layer underneath from any additional colors that you would like to add with mica powder mixed with water, thus creating a resist effect. One drawback is that the shimmer doesn’t catch the light the same way it does as when the mica powders are activated with water. It gives it a completely different shimmer that is beautiful in its own way.
We’ll be trying out 4 different mediums today with the Luster Mica Powders: Liquitex Professional Super Heavy Gloss Gel, Liquitex Professional Gloss Gel, Claudine Hellmuth Studios Multi Medium Gloss, and Prima Marketing Art Basics Light Paste (this is an opaque matte medium, but I threw it in to show you the difference). For all different gels I first mixed the powder in using a palette knife on a silicone mixing surface before applying to my surface.
1. Liquitex Professional Super Heavy Gloss Gel with Luster Mica Powder in Hawaiian Orchid:
The Super Heavy Gel was a pleasure to work with. It mixed up easily and it works wonderfully with stencils. The stencil I used in this picture is called Stripes and it’s by Tim Holtz. They are made to be broken up like it’s shown here and I was easily able to apply the gel through the stencil with a palette knife. You can see how different some of the Luster Mica Powders look depending on the light angle and the color they are applied too. Hawaiian Orchid is a color shifting powder. It switches between violet to a more pink/ fuchsia color on black. On white, it stays prevalently pink with a touch of purple shimmer coming through. On the upper right hand corner of the first and second picture you can see where we dragged one of the Texture Tools through the gel. It worked great!
2. Liquitex Professional Gloss Gel with Luster Mica Powder in Gramma Nutt:
Gloss Gel preformed just as well as the Super Heavy Gloss Gel just with a little less heft to it. The gloss gel feels a little more creamy while the super heavy is almost more like a paste. They both dry completely clear and worked great. The smudge you see on the white background is from me partially cleaning the stencil and accidentally getting gel on the opposite side, so it’s by no fault of the gloss gel. The picture shows the gel laid down via palette knife, one of our texture tools, and then used with the Tim Holtz Harlequin Stencil. As you can see from the pictures, Gramma Nutt color shifts as well. This color shifts from blue to a orange/gold. The shift is also more prevalent on the black cardstock whereas the white stays mostly blue with a little of the orange shimmer coming through.
3. Claudine Hellmuth Studio Multi Medium Gloss with Luster Mica Powder in 24 Karat Gold:
Claudine Hellmuth Multi Medium Gloss performed better than I expected. Being that this gel is less viscous than the other gels, I figured it wouldn’t perform well with the stencil at all. I could easily get it to drip from my palette knife. I was pleasantly surprised to see that it worked perfectly fine with the Tim Holtz Doily Stencil! 24 Karat Gold Luster Mica Powder looks pretty much the same on a light or dark, but still appears a little more brilliant on the black.
4. Prima Marketing Art Basics Light Paste with Luster Mica Powder in Blue Ice:
Prima’s Light Paste is definitely not the first thing I would think about mixing with Luster Mica Powder. It is an opaque matte paste which is the opposite of what helps shimmer shine. However, I am glad I tried because I did discover something interesting which can have its time and place to be used. If you apply it thinly, you can see the color and a little bit of the shimmer. If it’s thick, then it is opaque and you really just get the color of the mica powder as it would have looked on a white background and no real apparent shimmer. BUT if you look closer to the bottom picture, you will see that it has some shimmer coming out through the matte paste. It reminds me of when the sun hits a rock just the perfect way in the desert. It has a beauty of its own and could be used for certain projects. Blue Ice is a color that is much more apparent on a black surface. When it is applied over white it really looks more like a super pale blue.
Here’s the video showing me performing these techniques:
That’s it for the first technique! I hope you learned something today! Thanks for stopping by!
Intoxicating Arts is your shop for all of your lovey dovey Valentine’s wood laser cuts this year! We have TWELVE different love themed laser cuts up on our E-Bay Store right now! Click the pictures below to get to the listing and place your order now!
Sparrows with Hollow Heart is only $2.59!
Love you Script with Hearts is only $1.29!
This Love you Script is a little smaller and has a hollow heart adjoining the two words. So cute! Only $1.09!
This set allows you to mix and match different wood colors if you would like. They are stackable and end up being 1/4″ high! The set includes 4 pieces and is $3.99.
Stackable hearts are a great staple to have in your craft room. This set includes a total of 18 hearts and it’s just $3.59!
This Love You With All My Heart set is $5.50 and it’s a great value for how many large laser cuts you get!
This HUGE Valentine’s set includes a ton of laser cuts! These can also be bought in smaller sets, but you get a discount by buying them together. All of these are just $7.09!!
This is one I made last year, but I wanted to share it. $2.39 for one.
This large Love Tree is $4.95. It’s 5-1/2 x 5-1/2″
Kiss Me Lips is another one I made last year. I still really like this one! $2.39 for one.
This XOXO heart set is laser cut from light birch wood. It’s great if you prefer the wood grain instead of MDF. It takes stains beautifully! $2.75 for the set.
I saved my personal favorite for last! This conversation hearts set includes a total of twenty 0.69″ tall hearts and it’s just $3.95!
I hope you saw something you like! Remember, just click the pictures to get to the listing for that item. You can also CLICK HERE to get to the laser cuts part of my E-bay Store. Thank you for stopping by!
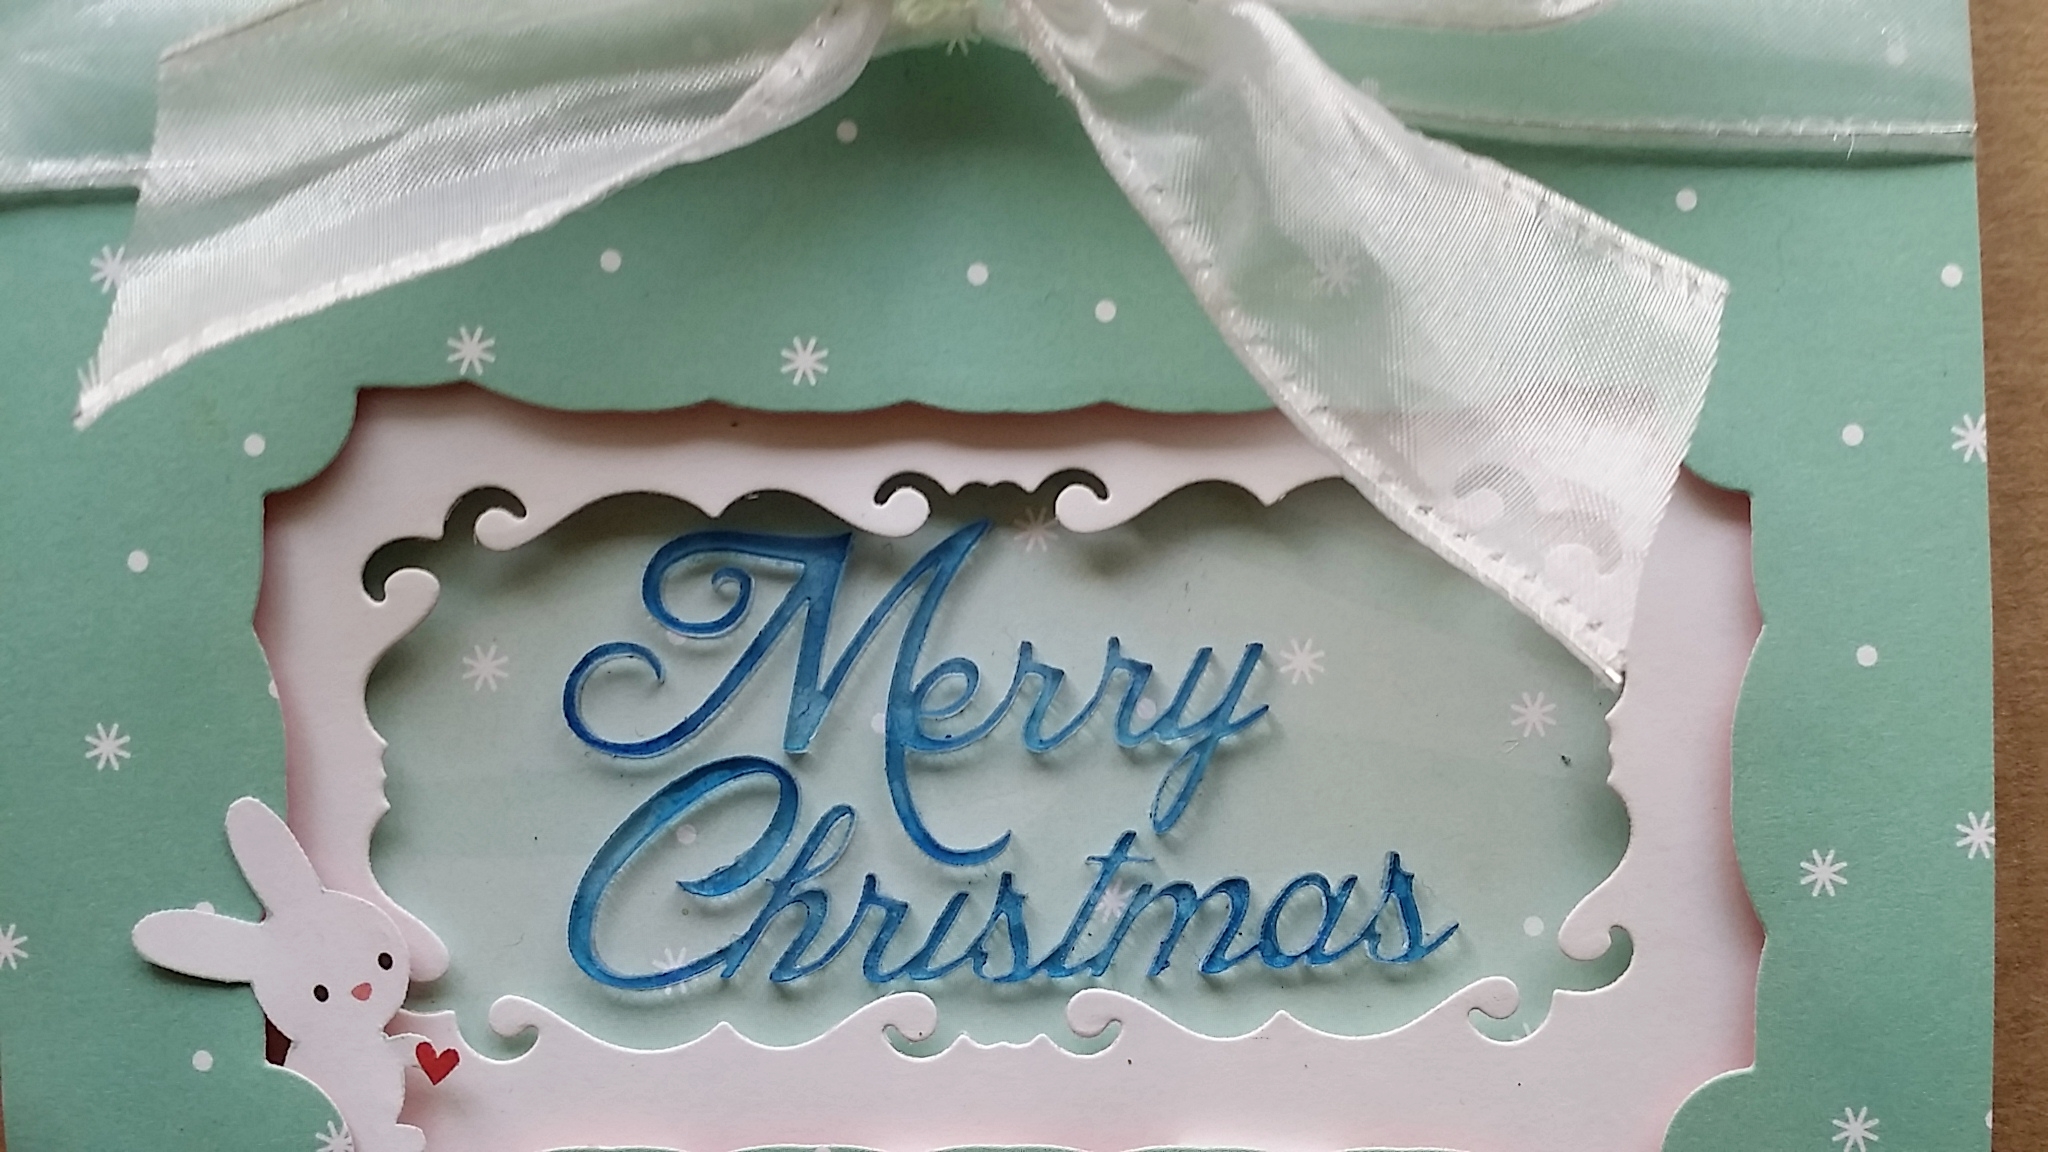
I was hoping to have more time to write blog posts about these cards, but the time just flies! So, I am posting them to share with you and because I used my blog as a digital scrapbook of my creations that I will never see again!
I won’t get too much into the details, but here’s a few facts:
•The “HoHoHo” is one of my wood laser cuts that has been painted using Luster Mica Powders!
• The blue “Merry Christmas” is one of my acrylic laser cuts that was colored using alcohol inks.
• I used Lawn Fawn’s Snow Day paper and DCW Heirloom Christmas (one of my all time Favorite Christmas Stacks!)
• The Gold stars that I shot a close up of were not part of the paper. I used one of my trailing stars stencils and mixed Luster Mica Powder with gel medium.
Here’s a little tip: ALWAYS Check the $1.00 stamps at Michael’s and Wal-Mart. I have found some major gems in there that would normally cost $4-5 otherwise.
Thank you for stopping by and have a VERY Merry Christmas!
Another month has passed and another family member’s birthday has passed as well. I don’t know about you guys, but it seems like there is a birthday every month between my family and friends. There’s some months that I end up celebrating 2-3 birthdays! For me, April and May are the only months that I don’t have to make cards for, but of course I could make Easter and Memorial Day cards if I wanted to. I love that it means I absolutely MUST craft to make a card . Sometimes it’s a little hard to fit it in, but I try to make an effort to make them feel special on their day.
This is the card that I made for my older sister. I used a laser cut wood piece that I had laying around and tried out my new mica powder colors on her card too! I plan on releasing these very soon, but I wanted to test/play with them a little first. The dies that I used were Spellbinders and I got the pack for $10.00 at the rubber stamp event we went to. The flower stamps were in a $0.79 pack that I got from my LSS. Can you believe I found a red rubber cling stamp set for only $0.79!? That was a major score! I used a Cuttlebug embossing folder and peacock feathers distress ink for the background. The paper was an old Prima pad that I have and I can’t remember what it was called, but I want to say Sunflower since that’s pretty much what the entire paper pad was comprised of. Here’s the card:
She really liked it and says she wants to keep it! Of course, that is pretty much the best complement, since us card makers can’t even fathom the thought of a recipient throwing away our crafty gift that took us hours to make and we even were nice enough to use our special secret-stash-hoard items on. Yeah, you know what I mean! I hope you like the card as much as she did. Thank you for stopping by my blog!
Hi Everyone! I tried doing some paper quilling a few months back on a card and I really didn’t know what I was doing. I had bought the Lake City Crafts Quilling tool at a crafting convention and didn’t really know what to do with it. When it was time to make a birthday card for my Step-Mom, I knew I wanted to try a different technique than I usually do. Then I remembered that quilling tool and started doing some research. I found that quilling boards can help you create consistent circles and then you can pinch those circles in certain ways to make different shapes. Once I did a little research I realized that paper quilling is not as complicated as I was trying to make it. There are some good websites online with free information to help you get started . There’s even a quilling forum! I plan on incorporating quilling in some of my holiday cards as well. Check out these quilled Poinsettias!
After I did my research I decided that I really liked the flowers that had all of the perfectly sized petals and leaves. I knew that I wouldn’t be able to do that by ‘eyeballing’ it. I needed a quilling board, but I didn’t have enough time to get one online because I only had two days before the birthday party and I also didn’t want to have to search one out since I know quilling isn’t the most popular paper crafting technique. So, what’s a girl with a nice pile of wood, a computer , and a laser cutter to do? Design and cut my own, of course! My qulling board is about 6″ x 5-1/2″ and hasmany different size holes to chose from. It’s only $3.50! Buy it here on our website. I used the 20mm, 15mm, and 10mm circle sizes to make the card below. The larger flower on the left was a freehand technique that can also be done using pins and a corkboard.
I’m so excited to announce that Intoxicating Arts now carries Art Impressions stamps! These fun stamps are a great way to add some laughter to your cards. Art Impressions is well known for their Girlfriends series. They also have “shake your booty” stamps which are made specifically for use with action wobbles. Another fun series they offer is the “Try-Folds” stamps. These stamps are made for use with tri-fold cards. As you un-fold the card, the story that the stamps made comes to life! Have you been looking for the perfect stamp for someone who has a birthday coming up and they are not looking forward to it? Art Impressions stamps turn the dreaded birthday and the thought of turning yet another year older into a comical occasion.
Here’s some of the sets we have in stock right now.
To the End Shake your Booty
Wine Tasters Set – from the Girlfriends series
Sleepy Santa Try-Fold
Fire Out Set
Aren’t these stamps just so fun?! These images are just a little peek into all of the great stamps we have in stock right now! Thank you for checking it out and have a wonderful Friday!
To make this Thank You card, I used Lawn Fawn’s NEW Thank You Tags Stamp Set. The ” i loved your gift” stamp is one of the $1 Michael’s Stamps, but the hearts on each side of that are from Lawn Fawn, however they are from a different set. I love that Lawn Fawn’s stamps are easy to mix and match with all of their sets. They have a consistent look that makes everything cohesive. I used three different papers from their new “Sweater Weather” Collection pack. Unfortunately, I did not order either one of these sets, so I don’t have them for sale. I wanted to share the card with you anyways because it is a very easy one to put together. Feel free to use this design on your next card!
I had some fun last weekend making some Halloween cards using some NEW Lawn Fawn Stamps. I really enjoy making scene cards. I made almost the same scene on all of these cards, but I used different techniques each time. I used alcohol markers with the distress spritzer, water color, distress ink blending, masking , etc. I plan on making more of these scene cards and trying out different techniques to see how many cool looking sunsets I can get! I used the little hill from Lawn Fawn’s “Life is Good” stamp set. The cat and sentiment are from Lawn Fawn’s “Spooktacular” and the tree and leaves are from Lawn Fawn’s “Sweater Weather” . Both of the sets are available in our store by clicking the link. They are only $14.49 and you get FREE shipping if you spend over $40.00. That’s pretty easy to do considering we currently have 25 different items from Lawn Fawn available!